Tuesday, October 14, 2014
Sunday, October 12, 2014
A Short Video Of My Aermaccchi
After repairs to the gear box, clutch, and electrical system, a short video of my Aermacchi running.
Sunday, September 21, 2014
Aermacchi Update
I've found that buying a vehicle online is usually full of surprises. On rare occasions a vehicle might be better than you were expecting, but more often the the vehicle doesn't quite live up to the sellers description. When I bought my Aermacchi, it was suppose to be a "good running bike". When the bike arrived, I'm not sure that's how I would describe it. After the bike arrived, the first thing I did was change the gear box oil, put a fresh spark plug in it, and start to put some gas in it. Adding the gas was when things started to go awry. As I was adding gas it began leaking all over the shop floor. I guess I should have looked closer, but the Aermacchi's fuel petcock was about half unscrewed from the tank with no seal washer. You may think how could I miss something like that?
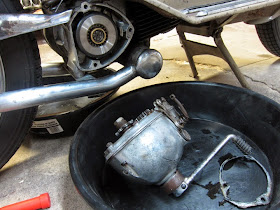
Well, the Aermacchi's petcock is very hard to find if you don't know where it's at. Maybe that's an anti theft feature since it has no keyed ignition. The petcock located is up under the body work near the swing-arm springs. When I first went to put gas in it, I glanced up under the body work to see that the lever was in the off position, but I didn't notice that the petcock was not completely screwed in. I wish things were as simple as just tightening the petcock, but to either remove or tighten the petcock requires removing the gas tank and rear fender. The petcock also has to be turned to a specific position to remove or install the tank. After removing the gas tank and fender, I put a seal washer on the petcock, reinstalled the petcock leaving it 1/4 of a turn loose, reinstalled the tank and fender, and finished tightening the petcock the last 1/4 turn. Now I thought I was ready to see if it'd fire up. No such luck, the clutch was slipping when kick starting, there was no spark, and a ton of crud came down the fuel line getting trapped in the in-line fuel filter I had previously installed. OK, I've got a few things to resolve before I'm going to get to ride it.
The first thing I worked on was the electrical system. After removing the stator and flywheel cover, one problem was very apparent. Two of the three wires coming off the stator were disconnected. Not only were they disconnected, all three wires were black with no color markings.
After consulting with some members of the Italian Aermacchi forum, I learned what the correct color markings and wiring should be. One positive thing, the coils on the stator appear to have been recently rewound.
Also while wiring the stator I noticed the external coil was in rather poor condition with a shattered hosing and one broken terminal.
The chances of finding an original coil for this bike are very slim, and as much as I wanted to keep this bike 100% original, I decided to replace it with Vespa coil for now. Hopefully some day I'll find another Aermacchi coil.
The Vespa coil was a little larger and had a different mounting bracket configuration so it required some modification. While I was doing this I also went ahead and made and installed a complete new wiring harness since the original wiring was in kind of poor shape.
Next up was cleaning the tank. When the bike arrived, I thought the tank looked OK, but when I turned the fuel on after tightening the petcock, tons of rust and crud came down the fuel line. I took the tank to a car wash and did my best to blast all the loose rust and crud free. I then treated it with Evapo-Rust. The Evapo-Rust instructions say to leave it in for 4 hours, but I had much better results leaving it in for 24 hours. One other thing I wanted to do was, the first time I removed the petcock, there were the remnants of an old fuel filter than had mostly disintegrated. I had added an in-line filter so I thought I'd be alright but the second time I tried putting gas in the bike, so much crud was in the tank that it clogged up the petcock before ever getting to the inline filter. Even though I cleaned the tank, I don't want to take the chance of this happening again, so I needed to come up with a filter for the petcock.
I couldn't find a fuel filter that fit the Aermacchi's petcock, and additionally, the Aermacchi has a long stem on the bottom of the gas tank that the petcock screws into, and I wanted my filter to extend up into the gas tank, so I needed to machine a small extension that would work with the filter I bought.
The original petcock with the brass extension I made and a NOS OMG fuel filter.
A picture inside the Aermacchi's fuel tank showing the position of the filter with the extension I made. Even though I cleaned the tank, I was worried if the filter was recessed in the stem, it could possibly become clogged with crud again.
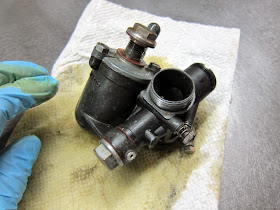
I also pulled the carb to give it a thorough cleaning.
While I was cleaning the carb, I noticed that the float had a leak and was partially filled with gas.
Cleaned carb after being completely disassembled and cleaned with an ultrasonic cleaner and glass bead blasting the exterior. Additionally all gaskets were replaced as well as the float, needles, and jets.
At this point I put the bike back together and put oil and gas in it and was able to get it to fire up despite the clutch slipping while trying to kick start it. On my first ride I encountered a new problem. The bike would not stay in 2nd or 3rd gear. Time to work on the clutch and gear box.
One nice feature about the Aermacchi's gear box is that it's kind of what I'd call an external gearbox that can be removed by removing three bolts. Once the gear box has been removed, you can see the dry clutch behind it.
Once I had the gear box apart, I noticed the the teeth on the sliding clutch gear that engage 2nd and 3rd gear were pretty worn. Since the chances of finding one of these in better condition than this one are very very slim, I'll have to work with what I have.
I built up the worn teeth with weld and then filed them to the correct shape.
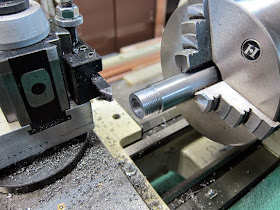
The next thing to deal with was the clutch. I'd been told that often the cause of the Aermacchi's dry clutch slipping was oil from the gear box had worked it way into the plates. The first thing I needed to do was get the clutch removed. Unfortunately the puller needed to remove the clutch is a very odd size and required me to make it.
The puller required for the Aermacchi's clutch is a M20.5 x 1.25 thread. As I mentioned, a very odd size.
Once I had the clutch removed and disassembled, I was surprised to find that the plates were clean and free of oil. Even so, I thoroughly cleaned all the clutch parts with brake/clutch cleaner.
One other possible culprit could be the clutch springs have gotten weak with age. I made a small spacer for each spring that should help increase the pressure the springs exert.
I had been hoping to have the Aermacchi running for a local vintage motorcycle show and just barely managed to get it back together a few days before the show, and I'm happy to report that it seems to be running pretty good. It starts right up, the clutch is no longer slipping, it shifts well and is no longer popping out of gear.
My 52' Aermacchi next to my 56' Csepel at the 2014 HoAME Vintage Motorcycle Show where it picked up a "Best Antique Preservation Motorcycle" award.
Getting ready for the ride home after a fun filled day.
Sunday, August 10, 2014
Cezeta 502
Oh boy, got a new scooter. Well not new, but new to me. It's a 1962 Cezeta 502. Made by CZ in Czechoslovakia. It's a 175cc with electric start. Pretty luxurious for a 60's eastern Europe scooter. It's quite a tank of a scooter, almost like a two wheel microcar. My wife's first comment upon seeing it was "wow it's big". It definitely weighs more than any of my other motorcycles. New parts are readily available and fairly reasonable so this should be a fun restoration.


